Product updates
New updates and improvements to CoLab.
Operator (early access)
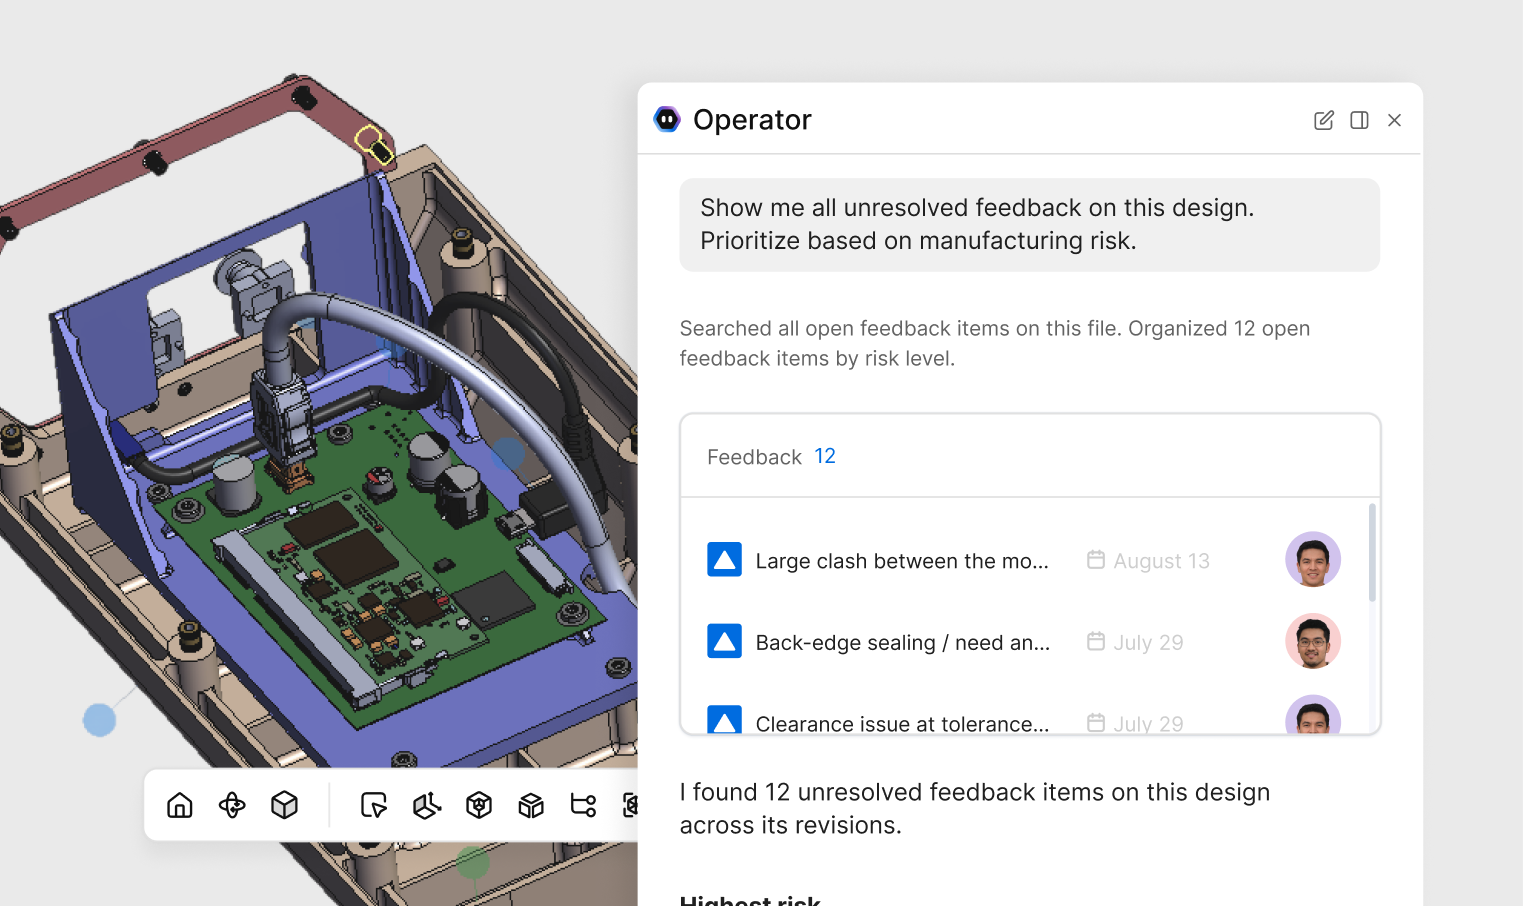
Operator is CoLab's AI interface for surfacing and acting on your engineering knowledge and design data. Operator can find what you need across your files, reviews, feedback, and standards, and perform actions inside CoLab for you.
What you can do today:
- Search. Find and synthesize information across your files, reviews, feedback, and standards, with every answer cited so you can trace where it came from.
- Analyze. Have Operator examine a drawing, reading details like tolerances, materials, and finishes, and weigh them against your project's context.
- Generate. Create new content from an Operator session, like a notebook, or visuals such as diagrams and charts inside a canvas.
Soon, Operator will also automate multi-step work inside CoLab, like creating reviews, acting on feedback, and running workflows in connected tools. 3D part analysis and more content types are also on the way.
Operator is in early access. Please reach out to request access.
CoLab integration for Siemens NX
The CoLab plugin NX adds a CoLab command to the NX ribbon, letting engineers upload the design they're working on directly to a CoLab workspace — without exporting or leaving NX.
Accepted file formats
NX uses .prt as the file extension for parts, assemblies, and drawings alike. The plugin handles all three:
- Parts — uploaded as-is
- Assemblies — the plugin traverses the full assembly tree and stages all referenced components automatically
- Drawings — converted to PDF before upload
Part Familiies are also supported.
Teamcenter
For teams running NX alongside Teamcenter, the plugin reads managed part numbers and revision IDs directly from the open file. That metadata is preserved on upload — no manual entry required.
Getting started
Installation requires a package matched to your NX major version. Head to our knowledge base within the application for installation documentation.
2D Pins
You can now drop feedback pins directly on 2D files and drawings without creating a markup first.
This gives reviewers a faster way to leave location-specific comments when they have a quick question, callout, or issue to flag. Instead of choosing a markup tool, drawing an annotation, and then typing a comment, users can place a pin on the drawing and start writing.
How it works
When viewing a 2D file or drawing, users can drop a feedback pin anywhere on the file. After placing the pin, they can type their comment and add the usual feedback details, including feedback type, assignee, and text-to-speech options.
Pins can also be moved before the feedback is submitted, making it easier to place the comment exactly where it belongs.
Once created, 2D pins show more detail as users interact with them:
- Static: shows the pin location
- Hover: opens a compact feedback preview
- Click: opens the full feedback card
This update is useful for quick comments that need drawing context but do not require markup. It keeps feedback tied to the right location while reducing the steps needed to capture it.
Measurements Enhancements
You can now take dimensional measurements directly on 3D models in CoLab including edge lengths, distances, radii, diameters, angles, and coordinates, without switching to a specific measurement type first.
How it works
Select the measurement tool from the bottom tool bar (default), Measure from the measurement drop-up in the bottom toolbar, or press M on the keyboard. The cursor changes to a ruler icon to indicate the tool is active.
Hover over any part of the model to highlight it. Click to select. The tool detects what you've selected and shows the relevant measurements automatically in a context menu on the viewer:
- Select a straight edge → edge length
- Select a circular feature → radius and diameter
- Select two faces → minimum distance between them
- Select a curved or irregular edge → edge length along the curve
For point-to-point distance and angle measurements, hold Shift and click to place two or three points. Release Shift to confirm and display the result.
You can switch between available measurement types from the context menu after selecting geometry — no need to reselect.
Measurement labels are draggable. Reposition them anywhere in the viewer if they're covering geometry. Labels stay correctly oriented when you rotate or move the model.
Feedback with measurements
Measurements are saved with feedback. When a reviewer opens feedback that includes a measurement, the measurement is restored in the viewer in the same state it was in when the feedback was created.
Active measurements also appear in the Model Browser under a dedicated Measurements tab.
More details
- The legacy measurement tools (edge, radius, diameter, angle, distance, point-to-point) remain available from the measurement drop-up for users who prefer them
- Measuring features that look like closed circles but are constructed from multiple rounded segments may not always return the expected result — full arc detection for partial circles is ongoing
Section Planes Enhancements: Geometry-based cutting and feedback integration

Section planes have been updated with new ways to define cuts and the ability to save plane state with feedback.
New panel UI and plane definition experience
Clicking the section planes icon in the bottom toolbar now opens a floating panel in the viewer. The panel shows controls for all active planes — show, hide, reverse, and lock — and stays open even when no plane is active. Active section planes are now color coded by axis.
Included with the standard X,Y and Z planes is a custom plane determined by selecting a plane on the model. Simply enable the “Face Plane” option and select a model face. This option is also available from the right-click context menu when the tool is active.
New panel UI
Clicking the section planes icon in the bottom toolbar now opens a floating panel on the viewer. The panel shows controls for all active planes — show, hide, reverse, lock — and stays open independently of whether a plane is active. A Custom cutting plane option is also available from the right-click context menu when the tool is active.
Feedback with section planes
Section plane state is saved with feedback. When you create a feedback item while a cutting plane is active, the plane configuration is captured alongside it. Anyone who opens that feedback later will see the model in the same cross-section you were working in.
When feedback with a plane is selected, the panel opens automatically (collapsed) and the toolbar icon highlights to indicate a plane is active. Planes clear correctly when navigating away from or between feedback items.
More details
- Rotating or moving the model does not affect the plane position
- Point-to-point measurements on cutting plane surfaces are supported when used alongside the Measure tool
Notebooks
A Notebook is a document you create and edit in CoLab, stored in Drive alongside your CAD, drawings, and reviews.
What you can use Notebooks for
- Review pre-reads. Write the intent, scope, and constraints of a review and attach it, so reviewers open it beside the model and start with context.
- Project overviews. Keep a summary of a project in one place: key contacts, review types, portal setup, and anything a team needs to get up to speed.
- Decision logs. Record tradeoffs, rationale, and outcomes attached to the work, so the decision trail is there for onboarding, audits, or follow-on programs.
- Supplier context. Share a Notebook to a Portal so suppliers see the same context internal teams do, without a separate email or attachment.
Creating and sharing Notebooks
To create a Notebook, right-click in the Drive file area, or click the "+" in the top Drive menu, and select the option to create one. Open it on its own or beside a CAD file or drawing, attach it to reviews, and share it to Portals.
Portal sharing affects guest editing. A Notebook shared to one Portal can be edited by guests. A Notebook shared to two or more Portals is read-only for guests, to prevent cross-supplier exposure. Otherwise Notebooks work like any other Drive asset: organize, favourite, duplicate, share, and link them.
Recently shipped and coming soon
Duplication and PDF export are now available. Coming next: comments and feedback inside Notebooks, and full-text search across Notebook body content.
*Until now, Notebooks only existed inside reviews. Those are still there, and are now called Review Notes. What's new is that you can create a Notebook on its own, as its own document in Drive, without a review attached.
Review Updates: Review Keys + Reopen Reviews
We're releasing two improvements to reviews in CoLab.
Reopen Reviews
Closed reviews can now be reopened.
Previously, if a design changed after a review was closed — or if feedback was missed — the only option was to start a new review from scratch, losing the thread of the original. Reviews can now be reopened and continued, keeping all existing feedback, comments, and history in one place.
Review Keys
Reviews in CoLab now have a unique identifier called a Review Key. This makes it possible to consistently reference a specific review outside of CoLab — in reports, other tools, or conversations — without ambiguity.
The key is visible in the review info panel and appears as a column in the reviews table. It is also included in both review history export formats, and exposed as a field on the review object in the Enterprise API.
- Review keys are assigned automatically — no action is required
- Keys have been back-populated to all existing reviews
- For teams using the Enterprise API, the key can be used to pull or reference specific reviews in external systems or reporting tools

Product updates
New updates and improvements to CoLab.